
This is part 1 of a setup guide and tutorial for my backpack kit configuration and modifications designed for a vagabonding nomad lifestyle.
Although this setup was specifically developed with the Triple Aught Design FAST Pack EDC, this guide can also be applied to other similar backpacks with your own adaptions and carry requirements.
The Vagabond Carry System //
The backpack, while the primary and most important part of my lifestyle kit, is still a part of a larger system. So it’s important to note the 2 other separate packs that work together as a single system.
My version of a daypack is what I call the “Sidearm” (described later) and an expanding RDDP1 Pouch that I use to mount directly to the backpack or my belt depending on the situation and carry needs.
The challenge of utilizing 3 different types of packs is to work as a single unit simultaneously and individually, I’ve found this works seamlessly.

The Concept //
The purpose of this current backpack kit configuration is to live out of it, in some ways literally. It is designed to be my mobile closet, survival kit and safe.
This means every inch has a specific use and every compartment reserved for specific item types. Much like a well organized bedroom cabinet or office desk.
Despite this, it is still a highly modular configuration that’s situationally adaptable and fully reversible.

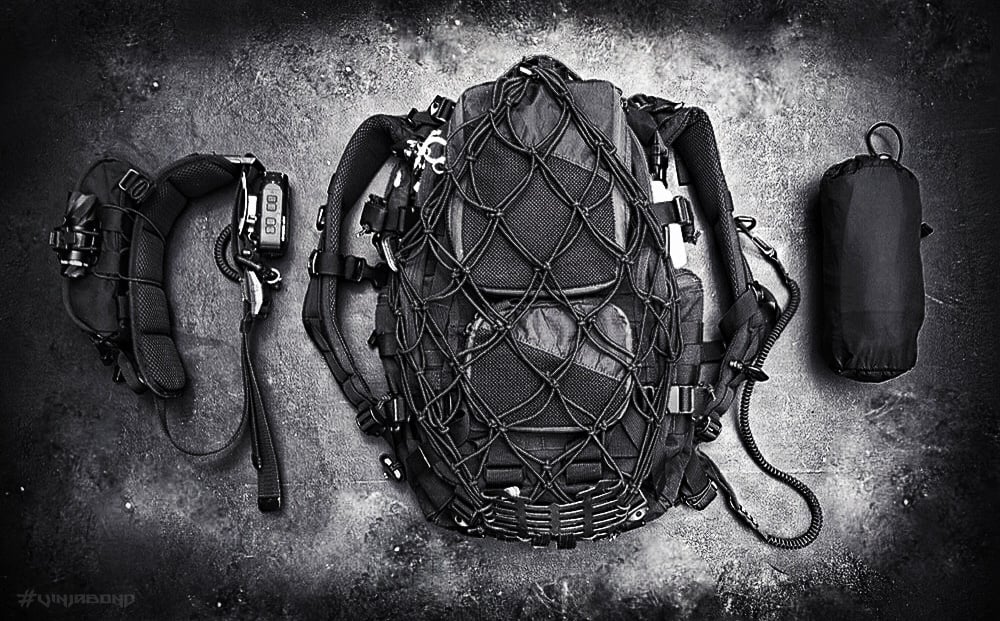
The Net //
Perhaps the most visible modification to my backpack is the netting that covers most of the front. I used a proprietary bungee cargo net that has wiring for electronic purposes (more on this in part 2) but you can find a generic and less costly version here.
This serves as additional carry options for outside of the backpack, keeping the exterior Transport Cube Airflows (more on this later) extra secure as well as a trigger for the alarm system.
[ INSTRUCTIONS ] The net should be elastic and therefore smaller than the face of the backpack, to minimize slack. There should be a minimum of 3 detachable points and 1 permanent anchor point.
The permanent point should be on the bottom of the backpack. I used a Grimloc on each side via MOLLE and an Arcus Carabiner for the top point. If you look closely, I used 2 separate but identical nets, I’ve found this works much better and is more reliable.
Some of the other mods in this post integrate with the cargo net so use them as references and guides.

The External //
Underneath the cargo net and mounted on the Transporter Tail are large and small (thin versions) Transport Cube Airflows. While there is room for these in the main internal compartment, these are exposed for ventilation purposes which work well with the mesh design of the cubes.
This was necessitated because of the tropical climates and beach locales I’ll be vagabonding indefinitely in. This means, constant laundry (but sparse drying opportunities), wet clothing and perspiration.
[ INSTRUCTIONS ] It may seem like the cubes are just placed on top of and secured only by the cargo net but they are in fact fully integrated as so:
This keeps the cubes completely secure while adding an external layer of compartmentalization, convenient access and easy detachments when needed.

The Guard //
The bottom of the backpack kit is integrated with a modified ModuLoader Pocket Shield and TacTies.
This serves several purposes; cargo net anchor point, alarm system base, and a deterrent to the “slash and drop” method of theft. The TacTies provide additional support for the cable lock as well as footwear holders.
[ INSTRUCTIONS ] The Shield is not attached directly to the backpack, by design. This is so that it can open up 180 degrees on a single axis for the net to function effectively and utilize the shoe carrying feature.
The net is also not attached directly to the Shield but by an independent bungee cord that wraps around the net on the sides to the Shield and the TacTies on the bottom. This allows flexibility with firmness.
Regardless, the 2 outer TacTies can be used to securely attach almost any type of footwear each.

The Tether //
A rugged but elastic tether has been integrated to the bottom of the right shoulder strap. The purpose of this is to temporarily attach to another bag or item in public places. For when my attention is elsewhere, sleeping at a station or as a quick item anchoring device.
For example, I would clip it to my belt if I’m napping waiting for a bus or to a secondary bag while I’m busy buying tickets for a bus, for theft protection.

The mods and additions in this area of the backpack is dedicated as an attachment point for the cargo net. An Arcus Carabiner connects the net to a mini C5 Case of which doubles as a quick access albeit small compartment (shown with a LockOut canister).
In addition, the C5 Case’s strap can be loosened or tightened to adjust the cargo net’s capacity.

The Sider //
Integrated onto the MOLLE of the side of the backpack kit is a Triple Aught Design iComm Pouch (discontinued, decent alternatives can be found here). This compartment is reserved for my first aid kit.
Ideally placed on the exterior of the backpack for quick access with the contents sealed in an ALOKSAK bag.

The Spatial //
Although the RDDP1 Pouch can be mounted to the backpack via MOLLE, I opted with the Arcus Carabiner due to constant detachments for different uses with and without the backpack. However, I primarily use it to store my Raptor Hoodie Jacket.
This pouch when not in use, can be self packed, making it 14 times smaller and ideal for minimalist carry.

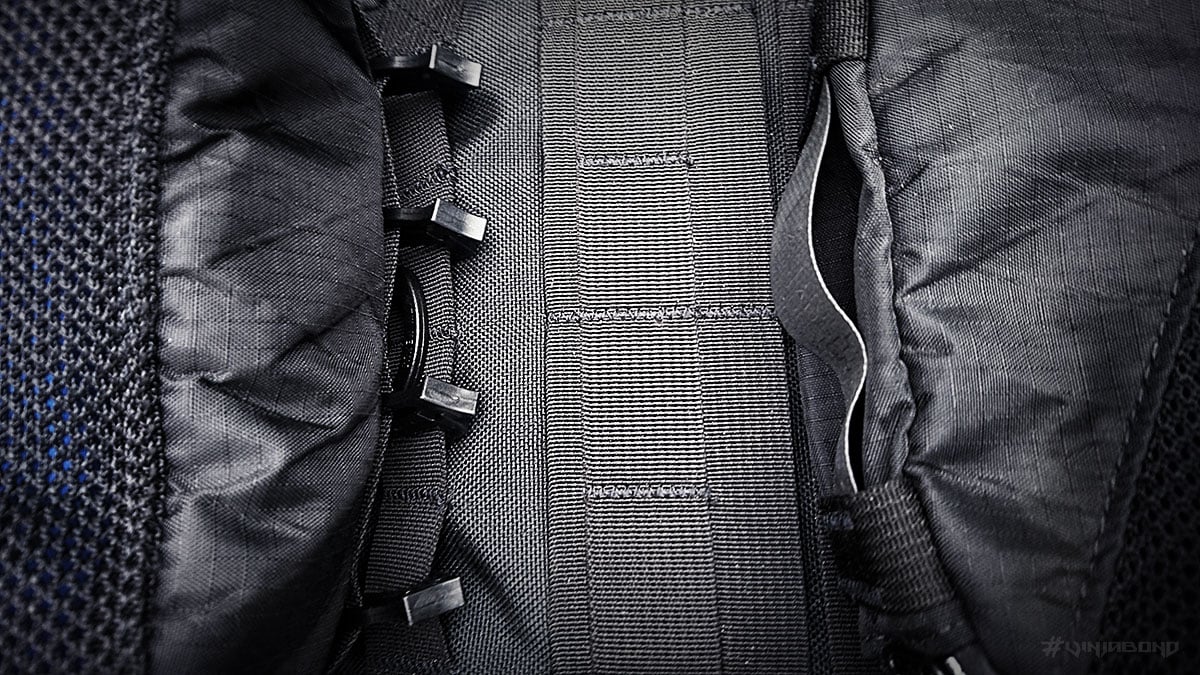
The Locks //
This is a dual function security lock mechanism. A cable lock is fully integrated around the entirety of the backpack and can be locked on to stationery objects (poles, furniture) to protect against “snatch and runs”.
The zippers of the primary compartments are modified to serve as locking ports for the padlock, which is anchored by the cable lock for effective zipper security.
[ INSTRUCTIONS ] The problem with traditionally adding a padlock to zippers is that the soft material around that area of a backpack can be displaced, bypassing the lock all together. This fixes that:

The cable lock is simply looped in an oval throughout the backpack’s existing MOLLE webbing.
For additional security, each keyring can be applied with a couple of drops of superglue on each opening end.

The Base //
The first layer of the main compartment is made up of 1 large Transport Cube Viewport for less used clothing (dependent on my current location and climate).
Directly below is a perfectly sized (for this position) microfiber travel towel with the included mesh case.

The Surface //
The top layer of the main compartment is made up of 1 small and 2 medium Transport Cube Viewports which are strategically placed as they are for the most used items; tech, tools, toiletries, shirts and pants.
Upon opening the backpack kit, I am presented with these 3 compartments ready for access without needing to remove anything but exactly what I need.

The Sidearm //
This is an experimental mobility EDC pack I designed made up of parts from 10 separate gear items and accessories. It’s meant to be worn on the shoulder like cauldron armor and serves as my daypack or go-bag. Essentially the “sidearm” to my backpack.
I created this in need for a small but agile pack with high functionality, speed of accessibility and can be compatibly worn while also equipping my backpack kit.
A post on this pack will be published in the future.

Part 2 of The VINJABOND Backpack Setup Guide will focus on the alarm system, secret compartments, mesh pockets, waterproofing, humidity control, laptop reinforcing and internal Transporter Tail Options.
This is my current backpack configuration, if you’re a Pro Member and would like to know more details on these and previous mods not shown here, contact me.
The VINJABOND Backpack Kit Setup

21 Comments
Finally!!! Been waiting for this for months bro!
Yeah? I’ve been waiting a year 🙂
You sir are a brilliant backpack engineer. Thank you for the inspiration for my own FAST PACK EDC.
I have the FAST Pack Litespeed coming to me any day now, do you think your mods will work with as well as the EDC?
Yes, all mods here will work exactly on both packs. Enjoy your new LS!
Ohh i got some work cut out for me.
I think this is your best setup yet. I love your creativity and functionality. Just ordered all the parts I needed for (almost) your exact setup. Can’t wait, and I’ll be hitting you up for those pro member details.
Can’t wait to see the results, and yeah, let me know if you need help with it.
BAD. ASS. (!!!)
(…other than that, I’m pretty much speechless….)
j.
Awesome, I just grabbed a paid membership to view the full guide. Love the backpack customization posts.
Great Post (as always) Thank you. The use of the RDDP1 Pouch as a stow for your Raptor hoodie is outstanding. What size Jacket do you use for scale?
bitchin
homeland security must love you….
I would hope they would love one of their own.
Thank You John for this much anticipated post on Fast Pac EDC mods. All your ideas will be so valuable for making mods to my own Fast Pac setup. Regarding the cargo nets; I was able to find mine at a Harley Davidson retail store. They come in 12x12inch, 15x15inch, and 18x18inch sizes for between $12-$16 bucks a piece. The nets come with their own attached hooks but with your ideas I will be using a few Black Diamond carabiners as permanent anchors on the sides and the top of the pack. Your previous posts on the Human Gear Go containers and Cuban Fiber water resistant travel pouches have been a godsend to me for keeping all loose items in the pack organized and secure. Your website and your posts just might one day be a significant factor in educating people about and helping humanity realize an elegant return to our nomadic roots lost so long ago in history. Thank you so much John for being you and deciding to share your self and your ideas with the world. You have affected so many lives in such a positive way. Godspeed in going forward!
where is part 2, looking for the net info
John, what is the length in feet of the cable lock that you use to secure the pack? I have seen 4′,5′,and 6′ locks online but am unsure which size will best fit the pack. Thanks
What brand of cargo net do you use? You posted about the link for the generic version but I cant find anything about the brand you use. Also whens part 2 coming out?
waiting!!!!
“A post on this pack will be published in the future.” I am looking forward to it and I will love to read about it.
Part 2 is coming soon my friend.